根据 Jupyter |
您所在的位置:网站首页 › jupyter输出hello world的代码 › 根据 Jupyter |
根据 Jupyter
|
前言
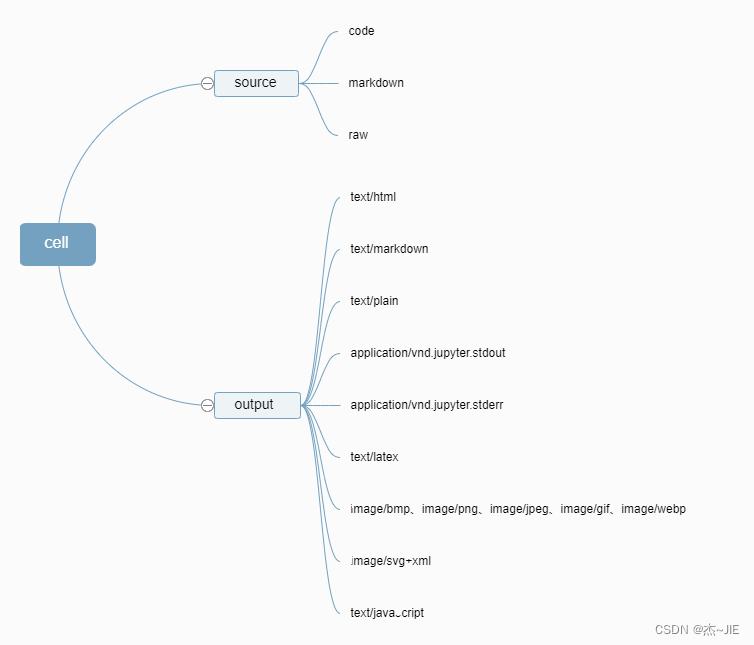
最近因为工作项目的需要,要在项目中尽可能的还原notebook渲染效果。由于网上没找到相关的指导文章,所以只能生啃JupyterLab源码,独自摸索实现。经过一段时间“跌跌撞撞”的摸索尝试,总算勉强实现了。 因此编写此文章做一下分享,给需要的朋友提供一下思路。同时也算一个记录,以便以后需要可以快速重拾。 具体实现代码可查看:render-juypter-notebook-vue/src/utils/notebook at master · Z-J-wang/render-juypter-notebook-vue (github.com) 实现思路我大体的实现思路如下——摘取JupyterLab中notebook渲染的相关代码,进行二次开发实现notebook的渲染。 此外本文所有源码调试和运行效果都是基于JupyterLab所提供的examples/notebook案例。在控制台切换到案例目录下,执行python main.py即可运行该案例。 以下是案例的notebook文件(test.ipynb)内容: { "cells": [ { "cell_type": "code", "execution_count": 1, "metadata": { "tags": [] }, "outputs": [ { "name": "stdout", "output_type": "stream", "text": [ "hello world\n", "0\n", "1\n", "2\n" ] }, { "name": "stderr", "output_type": "stream", "text": [ "output to stderr\n" ] }, { "name": "stdout", "output_type": "stream", "text": [ "some more stdout text\n" ] } ], "source": [ "import sys\n", "sys.stdout.write('hello world\\n')\n", "sys.stdout.flush()\n", "for i in range(3):\n", " sys.stdout.write('%s\\n' % i)\n", " sys.stdout.flush()\n", "sys.stderr.write('output to stderr\\n')\n", "sys.stderr.flush()\n", "sys.stdout.write('some more stdout text\\n')\n", "sys.stdout.flush()" ] }, { "cell_type": "markdown", "metadata": { "tags": [] }, "source": [ "# Markdown Cell\n", "\n", "$ e^{ \\pm i\\theta } = \\cos \\theta \\pm i\\sin \\theta + \\beta $\n", "\n", "*It* **really** is!" ] }, { "cell_type": "code", "execution_count": 2, "metadata": { "tags": [] }, "outputs": [ { "ename": "SyntaxError", "evalue": "invalid syntax (, line 1)", "output_type": "error", "traceback": [ "\u001b[0;36m File \u001b[0;32m\"\"\u001b[0;36m, line \u001b[0;32m1\u001b[0m\n\u001b[0;31m this is a syntax error\u001b[0m\n\u001b[0m ^\u001b[0m\n\u001b[0;31mSyntaxError\u001b[0m\u001b[0;31m:\u001b[0m invalid syntax\n" ] } ], "source": [ "this is a syntax error" ] }, { "cell_type": "code", "execution_count": null, "metadata": { "tags": [] }, "outputs": [], "source": [ "print('test')" ] }, { "cell_type": "code", "execution_count": 4, "metadata": { "tags": [] }, "outputs": [ { "data": { "text/latex": [ "The mass-energy equivalence is described by the famous equation\n", " \n", "$$E=mc^2$$\n", " \n", "discovered in 1905 by Albert Einstein. \n", "In natural units ($c$ = 1), the formula expresses the identity\n", " \n", "\\begin{equation}\n", "E=m\n", "\\end{equation}" ], "text/plain": [ "" ] }, "execution_count": 4, "metadata": {}, "output_type": "execute_result" } ], "source": [ "from IPython.display import Latex\n", "Latex('''The mass-energy equivalence is described by the famous equation\n", " \n", "$$E=mc^2$$\n", " \n", "discovered in 1905 by Albert Einstein. \n", "In natural units ($c$ = 1), the formula expresses the identity\n", " \n", "\\\\begin{equation}\n", "E=m\n", "\\\\end{equation}''')" ] }, { "cell_type": "code", "execution_count": null, "metadata": { "collapsed": true, "jupyter": { "outputs_hidden": true } }, "outputs": [], "source": [] } ], "metadata": { "anaconda-cloud": {}, "kernelspec": { "display_name": "Python 3 (ipykernel)", "language": "python", "name": "python3" }, "language_info": { "codemirror_mode": { "name": "ipython", "version": 3 }, "file_extension": ".py", "mimetype": "text/x-python", "name": "python", "nbconvert_exporter": "python", "pygments_lexer": "ipython3", "version": "3.11.0" } }, "nbformat": 4, "nbformat_minor": 4 } 关于JupyterLab对notebook的说明JupyterLab是一个notebook Web编辑器。其基本工作流程是: 用户编辑内容;JupyterLab将内容转义成.ipynb文件格式(即,notebook文件);将.ipynb文件转义成JSON字符串;对JSON字符串进行渲染;**概括来说,第一第二步属于JupyterLab的编辑功能;第三步第四步属于JupyterLab呈现功能。**这里我们是为了实现notebook在项目中的呈现,所以只需研究渲染这两步即可,其中重要的内容都在第四步——对JSON字符串进行渲染。 JupyterLab会将notebook内容分为一个个Cell进行存储。Cell中主要由source(即用户输入数据)和outputs(source运行结果)两部分构成;outputs是个数组,里面存放的是多个output。此外,source和output分成不同类别,不同类别对应不同的渲染函数。 具体如下:
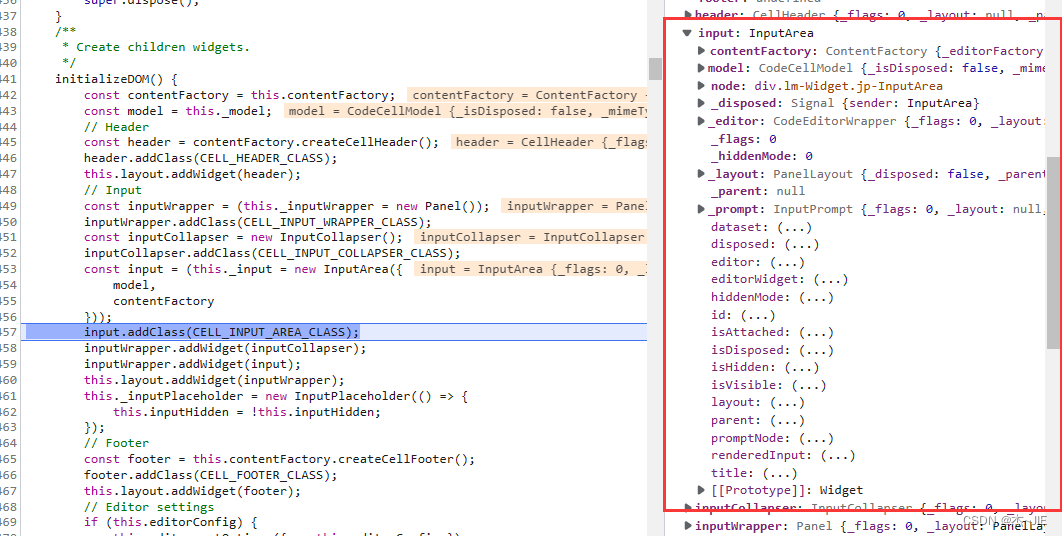
因此,要我们需要找到JupyterLab渲染source和output的代码。 在JupyterLab中找到这部分的相关源码并不容易,这里就不讲怎么去查找,直接说结论。 预处理源码分析首先,JupyterLab渲染cell时会先将cell的数据做进一步的封装处理。 处理的代码如下: fromJSON(value: nbformat.INotebookContent): void { this.sharedModel.transact(() => { const useId = value.nbformat === 4 && value.nbformat_minor >= 5; const ycells = value.cells.map(cell => { if (!useId) { delete cell.id; } return sharedModels.createCell(cell); }); this.sharedModel.insertCells(this.sharedModel.cells.length, ycells); this.sharedModel.deleteCellRange(0, this.sharedModel.cells.length); }); …… }源码地址:jupyterlab/model.ts at @jupyterlab/[email protected] · jupyterlab/jupyterlab (github.com) 可以看到,通过调用sharedModels的createCell方法封装cell。 createCell 源码: /** * Create a new cell that can be inserted in an existing shared model. */ export const createCell = ( cell: ( | Partial | Partial | Partial | Partial ) & { cell_type: 'markdown' | 'code' | 'raw' | string }, factory = BoundCellFactory ): YCodeCell | YMarkdownCell | YRawCell => { switch (cell.cell_type) { case 'markdown': { const mCell = cell as Partial; const ycell = factory.createMarkdownCell(mCell.id); if (mCell.source != null) { ycell.setSource( typeof mCell.source === 'string' ? mCell.source : mCell.source.join('\n') ); } if (mCell.metadata != null) { ycell.setMetadata(mCell.metadata); } if (mCell.attachments != null) { ycell.setAttachments(mCell.attachments); } return ycell; } case 'code': { const cCell = cell as Partial; const ycell = factory.createCodeCell(cCell.id); if (cCell.source != null) { ycell.setSource( typeof cCell.source === 'string' ? cCell.source : cCell.source.join('\n') ); } if (cCell.metadata != null) { ycell.setMetadata(cCell.metadata); } if (cCell.execution_count != null) { ycell.execution_count = cCell.execution_count; } if (cCell.outputs) { ycell.setOutputs(cCell.outputs); } return ycell; } default: { // raw const rCell = cell as Partial; const ycell = factory.createRawCell(rCell.id); if (rCell.source != null) { ycell.setSource( typeof rCell.source === 'string' ? rCell.source : rCell.source.join('\n') ); } if (rCell.metadata != null) { ycell.setMetadata(rCell.metadata); } if (rCell.attachments) { ycell.setAttachments(rCell.attachments); } return ycell; } } };源码链接:jupyterlab/ymodels.ts at 1215b4515972ad41806a6262e3aa67911a7a0ec7 · jupyterlab/jupyterlab (github.com) 对于'markdown' | 'code' | 'raw'这三种类型的Cell,定义了不同的处理方法。尽管处理的代码不同,但是它们之间的主要逻辑都是一致。因为它们最终都会return一个ycell对象。其中,markdown类型的Cell调用factory.createMarkdownCell生成ycell对象;code类型的Cell调用factory.createCodeCell生成ycell对象;raw类型的Cell调用factory.createRawCell生成ycell对象。 需要注意的是,ycell对象并不包含渲染结果,它只是方便后面渲染时的处理。这一点可以通过方法的传参看出。例如const ycell = factory.createCodeCell(cCell.id);。其参数只是ID,真正的内容字段source和outputs属性并没有被使用。 不过,这里也对source属性做了处理: if (cCell.source != null) { ycell.setSource( typeof cCell.source === 'string' ? cCell.source : cCell.source.join('\n') ); }即,将source属性值转为字符串,赋值给ycell对象。 注意: 这里对source属性的处理我们要记住。因为在我们自己的项目中实现时只会引用渲染相关的代码。所以我们要自己复现渲染前的操作,包括这里封装操作部分处理。 现在我们再回去观察outputs属性的处理,发现只有code Cell部分对outputs进行处理了。这是因为在JupyterLab中,只有code被执行后有输出结果。 注意: 这一点也要记住,在后面复现渲染前操作时会用到。 outputs处理代码如下: if (cCell.outputs) { ycell.setOutputs(cCell.outputs); }这只是简单的将outputs属性添加到ycell对象中。显然,对outputs的进一步处理并不在这里。又或者,根本不需要对outputs进行额外的处理? 下面是test.ipynb中的产出的ycell对象列表,可对照处理后发生了什么变化: [ { "id": "5c5df7c4-b6bc-4a3c-b447-b23233f63d56", "cell_type": "code", "source": "import sys\nsys.stdout.write('hello world\\n')\nsys.stdout.flush()\nfor i in range(3):\n sys.stdout.write('%s\\n' % i)\n sys.stdout.flush()\nsys.stderr.write('output to stderr\\n')\nsys.stderr.flush()\nsys.stdout.write('some more stdout text\\n')\nsys.stdout.flush()", "metadata": { "tags": [], "trusted": false }, "outputs": [ { "name": "stdout", "output_type": "stream", "text": "hello world\n0\n1\n2\n" }, { "name": "stderr", "output_type": "stream", "text": "output to stderr\n" }, { "name": "stdout", "output_type": "stream", "text": "some more stdout text\n" } ], "execution_count": 1 }, { "id": "a04b1f23-3d3e-437b-aad3-37cbed4122a8", "cell_type": "markdown", "source": "# Markdown Cell\n\n$ e^{ \\pm i\\theta } = \\cos \\theta \\pm i\\sin \\theta + \\beta $\n\n*It* **really** is!", "metadata": { "tags": [] } }, { "id": "ad03beff-4ee1-4f82-ad1c-dca3a61705fb", "cell_type": "code", "source": "this is a syntax error", "metadata": { "tags": [], "trusted": false }, "outputs": [ { "ename": "SyntaxError", "evalue": "invalid syntax (, line 1)", "output_type": "error", "traceback": [ "\u001b[0;36m File \u001b[0;32m\"\"\u001b[0;36m, line \u001b[0;32m1\u001b[0m\n\u001b[0;31m this is a syntax error\u001b[0m\n\u001b[0m ^\u001b[0m\n\u001b[0;31mSyntaxError\u001b[0m\u001b[0;31m:\u001b[0m invalid syntax\n" ] } ], "execution_count": 2 }, { "id": "6f299251-98ab-475c-b608-bcd378c2c48f", "cell_type": "code", "source": "print('test')", "metadata": { "tags": [], "trusted": false }, "outputs": [], "execution_count": null }, { "id": "e658bf6d-ade7-456a-9674-2de2668ac000", "cell_type": "code", "source": "from IPython.display import Latex\nLatex('''The mass-energy equivalence is described by the famous equation\n \n$$E=mc^2$$\n \ndiscovered in 1905 by Albert Einstein. \nIn natural units ($c$ = 1), the formula expresses the identity\n \n\\\\begin{equation}\nE=m\n\\\\end{equation}''')", "metadata": { "tags": [], "trusted": false }, "outputs": [ { "data": { "text/latex": "The mass-energy equivalence is described by the famous equation\n \n$$E=mc^2$$\n \ndiscovered in 1905 by Albert Einstein. \nIn natural units ($c$ = 1), the formula expresses the identity\n \n\\begin{equation}\nE=m\n\\end{equation}", "text/plain": "" }, "execution_count": 4, "metadata": {}, "output_type": "execute_result" } ], "execution_count": 4 }, { "id": "bd5879d8-661c-4986-8cf2-f4ed27e5cc49", "cell_type": "code", "source": "", "metadata": { "collapsed": true, "jupyter": { "outputs_hidden": true }, "trusted": false }, "outputs": [], "execution_count": null } ] 渲染源码分析前面提到Cell分为两部分:source和outputs。source是用户输入的数据,Jupyter渲染后并设置``contenteditable=“true”`属性,使其可以进行编辑;outputs是source执行的结果,不可以编辑。 我们在项目中所要的是对Notebook的呈现。因此,JupyterLab对source的处理,并不需要全部实现;而JupyterLab渲染outputs的代码,因为完全符合我们的预期,暂时认为可以照搬。 现在目的很清楚了,有两点: 找到source渲染代码,提取可用代码;找到outputs渲染代码,直接迁移; 定位渲染源码虽然前面找到了JupyterLab对notebook源数据处理的方法——createCell。但很可惜,只有对Cell解析封装操作没有任何渲染操作。当我想着通过调试createCell代码以找到真正的渲染代码时,悲催的发现JupyterLab是通过事件订阅侦听形式来调用渲染代码的。线性的debugger并不能帮我找到渲染代码。 好在通过查看JupyterLab依赖包,看到找到了cells依赖包——@jupyterlab/cells。@jupyterlab/cells很可能与Cell渲染有关,对其进行断点调试很快进定位到了与渲染有关的代码。 cells依赖包说明 @jupyterlab/cellsA JupyterLab package which provides an implementation of a Jupyter notebook cell. These cells are used in both the notebook and the code console. The result of cell execution is shown in an output area, which is implemented in @jupyterlab/outputarea. Markdown and raw cells can have attachments, which is implemented in @jupyterlab/attachments. 上面是@jupyterlab/cells的README.md。翻译过来就是: 一个用于实现Jupyter notebook cell的JupyterLab包。这些Cell在notebook和code console中都有使用。Cell执行的结果显示在输出区域中,该区域在@jupyterlab/outputarea中实现。Markdown和原始单元格可以有附件,这在@jupyterlab/attachments中实现。 @jupyterlab/cells包中widget.ts是Cell渲染的入口。其定义了三种类型cell的渲染类:CodeCell、MarkdownCell、RawCell以及三者的父类Cell。 source渲染代码的分析尽管JupyterLab对三种类型的Cell定义了各自的渲染类,但实际上渲染source是三者父类中的initializeDOM方法。 initializeDOM()中有这样一段代码: const input = (this._input = new InputArea({ model, contentFactory }));其返回的结果如下图:
下面是text.ipynb的第一个Cell的input对象中的node属性的outerHTML值: import sys sys.stdout.write('hello world\n') sys.stdout.flush() for i in range(3): sys.stdout.write('%s\n' % i) sys.stdout.flush() sys.stderr.write('output to stderr\n') sys.stderr.flush() sys.stdout.write('some more stdout text\n') sys.stdout.flush()可以看到, "source": [ "import sys\n", "sys.stdout.write('hello world\\n')\n", "sys.stdout.flush()\n", "for i in range(3):\n", " sys.stdout.write('%s\\n' % i)\n", " sys.stdout.flush()\n", "sys.stderr.write('output to stderr\\n')\n", "sys.stderr.flush()\n", "sys.stdout.write('some more stdout text\\n')\n", "sys.stdout.flush()" ]成功渲染出来的。 因此可以断定InputArea类就是渲染source的代码。查看其构造函数,发现其调用了CodeEditorWrapper类来渲染Cell: constructor(options: InputArea.IOptions) { super(); this.addClass(INPUT_AREA_CLASS); const model = (this.model = options.model); const contentFactory = (this.contentFactory = options.contentFactory || InputArea.defaultContentFactory); // Prompt const prompt = (this._prompt = contentFactory.createInputPrompt()); prompt.addClass(INPUT_AREA_PROMPT_CLASS); // Editor const editorOptions = { model, factory: contentFactory.editorFactory }; const editor = (this._editor = new CodeEditorWrapper(editorOptions)); editor.addClass(INPUT_AREA_EDITOR_CLASS); const layout = (this.layout = new PanelLayout()); layout.addWidget(prompt); layout.addWidget(editor); }继续深入调试查找,最终发现是通过@jupyterlab/codemirror包实现渲染的,最终渲染的代码如下: const view = new EditorView({ state: EditorState.create({ doc, extensions }), parent: host });源码地址:https://github.com/jupyterlab/jupyterlab/blob/1215b4515972ad41806a6262e3aa67911a7a0ec7/packages/codemirror/src/editor.ts#L1148 借助第三方插件CodeMirror渲染source如果经常涉猎页面web代码编辑器,看到EditorView可能会恍然大悟:”这不就是CodeMirror的代码吗?“。 没错,JupyterLab就是通过第三方插件CodeMirror实现在线编辑和呈现的。 所以,我们只需要在自己项目中引入CodeMirror来渲染source即可。 当然,如果想要尽可能的还原JupyterLab的渲染呈现,还需要剥离出JupyterLab的样式。 这个后面再说。 source 中的Markdown渲染尽管CodeMirror支持Markdown,但其只是对Markdown源码的呈现。为了实现更好的Markdown呈现效果,需要使用额外的呈现手段。 回看MarkdownCell类,发现有一个_updateRenderedInput方法,其中有这样一行代码:return this._renderer.renderModel(mimeModel); 完整代码如下: /** * Update the rendered input. */ private _updateRenderedInput(): Promise { const model = this.model; const text = (model && model.sharedModel.getSource()) || DEFAULT_MARKDOWN_TEXT; // Do not re-render if the text has not changed. if (text !== this._prevText) { const mimeModel = new MimeModel({ data: { 'text/markdown': text } }); this._prevText = text; return this._renderer.renderModel(mimeModel); } return Promise.resolve(); }对其进行调试,发现其调用了@jupyterlab/outputarea渲染Markdown的代码。 显然,在Markdown Cell发生变更时,JupyterLab采用了outputs Markdown的渲染逻辑来渲染Markdown Cell。 outputs渲染代码分析最后,就是outputs的渲染代码了。@jupyterlab/cells的README.md已经明确告知:**Cell的结果显示在输出区域中,该区域在@jupyterlab/outputarea中实现。**所以我们要去@jupyterlab/outputarea寻找outputs渲染代码。 不过先不要急着去直接去查阅代码。先看看在CodeCell是怎么调用@jupyterlab/outputarea的。关键代码如下: const output = (this._output = new OutputArea({ model: this.model.outputs, rendermime, contentFactory: contentFactory, maxNumberOutputs: this.maxNumberOutputs, translator: this.translator }));源码地址:https://github.com/jupyterlab/jupyterlab/blob/bd3c5c3a14f2b9de09e0f027601ad1c3b4e6524c/packages/cells/src/widget.ts#L970 显然是通过调用OutputArea类的实例化对象来实现的。随着不断的深入调试查找,发现真正的output渲染代码并不在@jupyterlab/outputarea中。而是调用 output.renderModel方法实现的渲染的。output对象通过this.rendermime对象的createRenderer方法创建。this.rendermime来自于options.rendermime,options.rendermime就是上面代码中的rendermime变量。 createRenderer相关代码: /** * Render a mimetype */ protected createRenderedMimetype(model: IOutputModel): Widget | null { const mimeType = this.rendermime.preferredMimeType( model.data, model.trusted ? 'any' : 'ensure' ); if (!mimeType) { return null; } let output = this.rendermime.createRenderer(mimeType); const isolated = OutputArea.isIsolated(mimeType, model.metadata); if (isolated === true) { output = new Private.IsolatedRenderer(output); } Private.currentPreferredMimetype.set(output, mimeType); output.renderModel(model).catch(error => { // Manually append error message to output const pre = document.createElement('pre'); const trans = this._translator.load('jupyterlab'); pre.textContent = trans.__('Javascript Error: %1', error.message); output.node.appendChild(pre); // Remove mime-type-specific CSS classes output.node.className = 'lm-Widget jp-RenderedText'; output.node.setAttribute( 'data-mime-type', 'application/vnd.jupyter.stderr' ); }); return output; }源码路径:jupyterlab/widget.ts at master · jupyterlab/jupyterlab (github.com) 很显然,@jupyterlab/outputarea仅仅是一个output封装的工具包。 这一点我们通过@jupyterlab/outputarea的README.md也可以得知: @jupyterlab/outputareaA JupyterLab package which provides an implementation of the Jupyter notebook output area. Execution results from both the notebook and the code console are placed in the output area. Output areas are able to render results of several different mime types, which are implemented in the rendermime package. This list of mime types may be extended via the simplified mime-extension interface defined in @jupyterlab/rendermime-interfaces. 摘自——《jupyterlab/packages/outputarea at master · jupyterlab/jupyterlab (github.com)》 注意第二段第一句话,翻译过来就是:输出区域能够呈现几种不同 mime 类型的结果,这些类型在 rendermime 包中实现。 原来真正渲染output的代码在@jupyterlab/rendermime。那这个rendermime变量肯定就是@jupyterlab/rendermime包中output渲染类的实例了。 可是,是在什么地方实例化并传递rendermime变量呢?其实是在JupyterLab创建的时候。查看JupyterLab提供的notebook案例可以看到: // 省略多余代码 import { standardRendererFactories as initialFactories, RenderMimeRegistry } from '@jupyterlab/rendermime'; // 省略多余代码 const rendermime = new RenderMimeRegistry({ initialFactories: initialFactories, latexTypesetter: new MathJaxTypesetter({ url: PageConfig.getOption('mathjaxUrl'), config: PageConfig.getOption('mathjaxConfig') }) }); // 省略多余代码 const wFactory = new NotebookWidgetFactory({ name: 'Notebook', modelName: 'notebook', fileTypes: ['notebook'], defaultFor: ['notebook'], preferKernel: true, canStartKernel: true, rendermime, contentFactory, mimeTypeService: editorServices.mimeTypeService }); // 省略多余代码源码地址:jupyterlab/index.ts at bd3c5c3a14f2b9de09e0f027601ad1c3b4e6524c · jupyterlab/jupyterlab (github.com) 解析createRenderer创建的output对象前面提到:通过调用了this.rendermime对象的createRenderer方法返回一个output对象,然后调用 output.renderModel方法实现的渲染的。 现在进入到@jupyterlab/rendermime看看createRenderer是如何创建output对象的,以及output对象里面有什么。 /** * Create a renderer for a mime type. * * @param mimeType - The mime type of interest. * * @returns A new renderer for the given mime type. * * @throws An error if no factory exists for the mime type. */ createRenderer(mimeType: string): IRenderMime.IRenderer { // Throw an error if no factory exists for the mime type. if (!(mimeType in this._factories)) { throw new Error(`No factory for mime type: '${mimeType}'`); } // Invoke the best factory for the given mime type. return this._factories[mimeType].createRenderer({ mimeType, resolver: this.resolver, sanitizer: this.sanitizer, linkHandler: this.linkHandler, latexTypesetter: this.latexTypesetter, markdownParser: this.markdownParser, translator: this.translator }); }源码路径:https://github.com/jupyterlab/jupyterlab/blob/b6b6d3f82d9abdc207135b4b4dabf421f61181ac/packages/rendermime/src/registry.ts#L132 通过源码可以知道,createRenderer通过参数mimeType获取this._factories中对应的factory,然后调用factory的createRenderer来创建output对象。this._factories在构造函数中创建,其值来自于options.initialFactories。options.initialFactories同options.rendermime一样,在jupyterlab创建时引入的,来自于@jupyterlab/rendermime。 RenderMimeRegistry类的构造函数: constructor(options: RenderMimeRegistry.IOptions = {}) { // Parse the options. this.translator = options.translator ?? nullTranslator; this.resolver = options.resolver ?? null; this.linkHandler = options.linkHandler ?? null; this.latexTypesetter = options.latexTypesetter ?? null; this.markdownParser = options.markdownParser ?? null; this.sanitizer = options.sanitizer ?? new Sanitizer(); // Add the initial factories. if (options.initialFactories) { for (const factory of options.initialFactories) { this.addFactory(factory); } } }源码地址:https://github.com/jupyterlab/jupyterlab/blob/b6b6d3f82d9abdc207135b4b4dabf421f61181ac/packages/rendermime/src/registry.ts#L40 initialFactories 被引入时的代码: import { standardRendererFactories as initialFactories, RenderMimeRegistry } from '@jupyterlab/rendermime';initialFactories原本名字为standardRendererFactories。因此,去@jupyterlab/rendermime查找,发现standardRendererFactories在jupyterlab/packages/rendermime/src/factories.ts中定义: export const standardRendererFactories: ReadonlyArray = [ htmlRendererFactory, markdownRendererFactory, latexRendererFactory, svgRendererFactory, imageRendererFactory, javaScriptRendererFactory, textRendererFactory ];每个factory的createRenderer来自jupyterlab/packages/rendermime/src/widgets.ts对应的渲染函数,对应的渲染函数又调用jupyterlab/packages/rendermime/src/renderers.ts对应的函数。而renderers.ts就是最终的output渲染代码。 总结经过一系列的分析查找,基本理清的JupyterLab是如何渲染notebook的。下面来回顾一下: 我们从notebook的数据结构出发,明确了notebook主要由source和outputs两部分组成。 @jupyterlab/cells是notebook的渲染入口。@jupyterlab/cells通过调用二次封装的Codemirror插件来渲染Code Cell和Raw Cell的source。而Markdown Cell的source则调用ouput中的Markdown渲染函数实现。 因为只有Code Cell有outputs,所以Code Cell渲染时触发outputs渲染。@jupyterlab/cells渲染outputs的函数来自于JupyterLab最初创建时实例化的rendermime对象。rendermime则来自于@jupyterlab/rendermime。@jupyterlab/rendermime根据不同的output.mimeType,设置了7个Factory(htmlRendererFactory、markdownRendererFactory、latexRendererFactory、svgRendererFactory、imageRendererFactory、javaScriptRendererFactory、textRendererFactory)来渲染output。这7个Factory又依赖于jupyterlab/packages/rendermime/src/renderers.ts所提供的渲染函数(renderHTML、renderImage、renderLatex、renderMarkdown、renderSVG、renderText)将output渲染成html。 因此,在项目中实现notebook渲染的要点2点: 使用Codemirror插件实现Code Cell和Raw Cell的source的渲染。根据jupyterlab/packages/rendermime/src/renderers.ts源码,二次开发实现output和Markdown Cell的source的渲染。 实现notebook的渲染注意:由于我所开发的项目没有使用Typescript,所以实现代码都为JavaScript。而且引入的源码也要是JavaScript版本。 JavaScript版本源码需要自行寻找。 经过上面的分析,我们确定了以Codemirror插件以及renderers.ts源码为基础来实现notebook的渲染思路。然而,两者只是渲染的工具,光有工具确没有使用的人可不行。由于JupyterLab这部分的异常复杂且涵盖多余的功能,所以无法直接使用。因此,我们需要创造一个"调度系统"来调用这些工具,以及组装渲染后的结果。 编写notebook渲染类——“调度系统”这里我把“调度系统”定义为Notebook渲染类。简单概括,Notebook渲染类具有如下功能: 遍历cells,根据不同的cell_type调用不同渲染工具组装渲染结果,形成一个DOMNotebook基本架构如下: class Notebook { #cells // 私有变量:notebook cell列表 #fragment // 私有变量:notebook 渲染结果片段,是个div元素 /** * cells 渲染 * 此处是 notebook 渲染的总入口。将遍历cells并根据cell_type调用不同source渲染方法 * 并将渲染结果存储在this.#fragment中 * @returns {DOM} 返回一个DOM */ render() {} /** * 渲染Code Cell * @param {Object} cell */ #renderCodeCell(cell) {} /** * 渲染Markdown Cell * @param {Object} cell */ #renderMarkdownCell(cell) {} /** * 渲染Raw Cell * @param {Object} cell */ #renderRawCell(cell) {} } notebook渲染入口——render()render方法是notebook渲染的入口,负责遍历cells并根据不同的cell_type调用不同的渲染函数。cell_type一共有三个值:code、markdown和raw,根据不同的类别调用不同渲染方法:#renderCodeCell、#renderMarkdownCell、#renderRawCell。 render() { for (let cell of this.#cells) { let node = null let { cell_type, source } = cell cell.source = typeof source === 'string' ? source : source.join('') switch (cell_type) { case 'markdown': node = this.#renderMarkdownCell(cell) break case 'code': node = this.#renderCodeCell(cell) break case 'raw': node = this.#renderRawCell(cell) break } this.#fragment.appendChild(node) } return this.#fragment } Code Cell 渲染代码的实现Code Cell需要渲染两部分: 依赖Codemirror插件来渲染sources依赖renderers.ts来渲染output 封装Codemirror——createCodemirror()来渲染sources /** * 调用 codemirror 插件渲染code,并调用 jupyterlab 的 codemirror 主题样式做渲染 * codemirror 插件: https://codemirror.net/ */ import { EditorState } from '@codemirror/state' import { EditorView } from '@codemirror/view' import { python } from '@codemirror/lang-python' import { sql } from '@codemirror/lang-sql' import { Theme } from './codemirror.theme' // 引入JupyterLab定义的codemirror样式 // Codemirror 扩展配置 const extensionsConfig = [ EditorState.readOnly.of(true), EditorView.editable.of(false), Theme.getTheme('jupyter'), // 主题引入 /* 引入所需的编程语言 START */ python(), sql(), /* 引入所需的编程语言 END */ ] /** * 调用codemirror插件渲染code * * @param {string} codeString 需要渲染的code字符串 * @param {Element} parent 父元素,渲染成功后得元素将作为其的子元素 * @returns {Element} 渲染完成后的父元素 */ export function createCodemirror(codeString, parent) { if (codeString instanceof Array) codeString = codeString.join('') if (typeof codeString !== 'string') throw 'Function createCodemirror: 参数 codeString 必须是字符串!' if (!parent) console.warn('Function createCodemirror: 参数 parent 不能为空') if (!('appendChild' in document.body)) { console.warn('Function createCodemirror: 参数 parent 类型错误,需为HTML元素') codeString = document.body } return new EditorView({ state: EditorState.create({ doc: codeString || '', extensions: extensionsConfig }), parent: parent || document.body, }) }为了和JupyterLab渲染结果保持统一,还需要引入JupyterLab的Codemirror样式覆盖默认样式。 源码地址:https://github.com/jupyterlab/jupyterlab/blob/master/packages/codemirror/src/editortheme.ts 实现 ouput 渲染通过前面的源码分析可以知道,JupyterLab是通过封装7个Factory来调用renderers.ts中的方法实现ouput渲染的。因此,我们要模拟7个Factory来实现调用renderers.ts。 代码如下: async #renderCommonCell({ type, options }) { // 对未设置的配置项,设置为全局默认配置对应的属性值 options.trusted = options.trusted || this.#trusted options.sanitizer = options.sanitizer || this.#sanitizer options.shouldTypeset = options.shouldTypeset || this.#shouldTypeset options.latexTypesetter = options.latexTypesetter || this.#latexTypesetter options.markdownParser = options.markdownParser || this.#markdownParser switch (type) { case 'text/html': await renderHTML(options) break case 'text/markdown': await renderMarkdown(options) break case 'text/plain': case 'application/vnd.jupyter.stdout': case 'application/vnd.jupyter.stderr': await renderText(options) break case 'text/latex': await renderLatex(options) break case 'image/bmp': case 'image/png': case 'image/jpeg': case 'image/gif': case 'image/webp': await renderImage(options) break case 'image/svg+xml': await renderSVG(options) break case 'text/javascript': case 'application/javascript': // 禁止输出 JavaScript options.source = 'JavaScript output is disabled in JupyterLab' await renderText(options) break default: break } }接下来就是调用#renderCommonCell。 由于,JupyterLab 将output分为四类。分别是:表示纯文本的stream;表示错误信息的error;表示富文本的display_data和display_data。 不同类别的数据构成各不一样,需要编写独立的处理方法,将这些不同的ouput数据构成转化成统一的数据构成来调用#renderCommonCell: async #renderOutputCell(outputs, parentNode) { if (!outputs || !outputs.length) return const OutputAreaNode = document.createElement('div') OutputAreaNode.className = 'lm-Widget jp-OutputArea jp-Cell-outputArea q-mt-sm' parentNode.appendChild(OutputAreaNode) for (let output of outputs) { let sources = [] switch (output.output_type) { case 'stream': // 文本流输出 sources = output.text for (const source of sources) { let node = document.createElement('div') await this.#renderCommonCell({ type: 'application/vnd.jupyter.' + output.name, options: { host: node, source: source }, }) OutputAreaNode.appendChild(node) } break case 'display_data': case 'execute_result': { // 富文本输出 const { data: outputData, execution_count: executionCount } = output const keys = Object.keys(outputData) const key = keys[0] let source = outputData[key] if (!source) return let node = document.createElement('div') source = typeof source === 'string' ? source : source.join('\n') await this.#renderCommonCell({ type: key, options: { host: node, source: source }, }) OutputAreaNode.appendChild(node) break } case 'error': // 错误信息输出 sources = output.traceback for (const source of sources) { let node = document.createElement('div') await this.#renderCommonCell({ type: 'application/vnd.jupyter.stderr', options: { host: node, source: source }, }) OutputAreaNode.appendChild(node) } break } } }这样就基本实现的ouput的渲染。 编写#createContainerNode方法来美化渲染结果如果直接将上面的渲染结果呈现在页面上,会发现效果特别差。所以还需要编写一个方法来套用JupyterLab的样式。大致做法如下: 首先,需要抽离JupyterLab的样式文件,并在项目中引入。 接着就是编写方法#createContainerNode来模拟JupyterLab渲染结果的页面结构。 最后就是在每个渲染结果输出前调用#createContainerNode方法即可。 #createContainerNode(type, contentNode, executionCount) { let node = document.createElement('div') let areaNode = document.createElement('div') let promptNode = document.createElement('div') if (executionCount || executionCount === null) { promptNode.innerText = `[${executionCount === null ? ' ' : executionCount}]` } // prompt class设置。prompt 样式分为input和output两种 ;['inputMarkdown', 'inputCode'].includes(type) ? (promptNode.className = 'lm-Widget p-Widget jp-InputPrompt jp-InputArea-prompt') : (promptNode.className = 'lm-Widget p-Widget jp-OutputPrompt jp-OutputArea-prompt') switch (type) { case 'inputMarkdown': { node.className = 'lm-Widget p-Widget jp-Cell jp-MarkdownCell jp-mod-rendered jp-Notebook-cell' areaNode.className = 'lm-Widget p-Widget jp-InputArea jp-Cell-inputArea' contentNode.className = 'lm-Widget p-Widget jp-RenderedHTMLCommon jp-RenderedMarkdown jp-MarkdownOutput' contentNode.setAttribute('data-mime-type', 'text/markdown') break } case 'inputCode': { node.className = 'lm-Widget p-Widget jp-Cell jp-CodeCell jp-mod-noOutputs jp-Notebook-cell' areaNode.className = 'lm-Widget p-Widget jp-InputArea jp-Cell-inputArea' contentNode.className = 'lm-Widget p-Widget jp-CodeMirrorEditor jp-Editor jp-InputArea-editor' break } case 'application/vnd.jupyter.stdout': { node.className = 'lm-Widget lm-Panel jp-OutputArea-child' areaNode.className = 'lm-Widget p-Widget lm-Panel p-Panel jp-OutputArea-child' contentNode.className = 'lm-Widget p-Widget jp-RenderedText jp-OutputArea-output' contentNode.setAttribute('data-mime-type', 'application/vnd.jupyter.stdout') break } case 'application/vnd.jupyter.stderr': { node.className = 'lm-Widget lm-Panel jp-OutputArea-child' areaNode.className = 'lm-Widget p-Widget lm-Panel p-Panel jp-OutputArea-child' contentNode.className = 'lm-Widget p-Widget jp-RenderedText jp-OutputArea-output' contentNode.setAttribute('data-mime-type', 'application/vnd.jupyter.stderr') break } default: { const typeClassMap = new Map([ ['image/bmp', 'jp-RenderedImage'], ['image/png', 'jp-RenderedImage'], ['image/jpeg', 'jp-RenderedImage'], ['image/gif', 'jp-RenderedImage'], ['image/webp', 'jp-RenderedImage'], ['text/latex', 'jp-RenderedLatex'], ['image/svg+xml', 'jp-RenderedSVG'], ['text/markdown', 'jp-RenderedHTMLCommon jp-RenderedHTML'], ]) node.className = 'lm-Widget p-Widget lm-Panel p-Panel jp-OutputArea-child jp-OutputArea-executeResult' areaNode.className = 'lm-Widget p-Widget lm-Panel p-Panel jp-OutputArea-child' contentNode.className = `lm-Widget p-Widget ${ typeClassMap.get(type) || 'jp-RenderedHTMLCommon' } jp-OutputArea-output` contentNode.setAttribute('data-mime-type', type) break } } areaNode.appendChild(promptNode) areaNode.appendChild(contentNode) node.appendChild(areaNode) return node } 整合代码最后的最后,整合上面的方法,就是createCodeCell的全部代码了。 async #renderCodeCell(cell) { let { source, outputs, execution_count: executionCount } = cell let contentNode = document.createElement('div') contentNode.classList = ['lm-Widget', 'p-Widget', 'jp-Cell', 'jp-CodeCell', 'jp-Notebook-cell'] createCodemirror(source, contentNode) // input代码块渲染 this.#node = this.#createContainerNode('inputCode', contentNode, executionCount) await this.#renderOutputCell(outputs, contentNode.parentNode.parentNode) } 关于Markdown Cell和Raw CellMarkdown Cell和Raw Cell的实现代码和Code Cell类似,自行实现即可。 写在最后至此,本地项目实现Notebook渲染的基本思路全部讲完了。实现代码比较粗糙,请多担待。 具体实现代码可查看:render-juypter-notebook-vue/src/utils/notebook at master · Z-J-wang/render-juypter-notebook-vue (github.com) |
【本文地址】
今日新闻 |
推荐新闻 |